Why are my freeze dry flasks breaking? 4 pre-freezing tips


After 15 years of telling customers not to fill their freeze dry flasks to the rim, and not to place their freeze dry flask straight up and down in the freezer, and not to put the lids on their freeze dry flasks during pre-freezing, guess what I did?
I made the southern favorite of chicken and dumplings and decided to keep the chicken broth for future use. I took out two recycled glass spaghetti sauce jars and filled them to the rim with broth, then proceeded to place them upright in my ultra-cold freeze with the lids on them. I'm sure you can guess what happened next. Later when my lovely organic chicken broth was defrosting, I heard a crack. When I looked to see what was going on, my jar had lovely cracks in it, and sticky chicken broth was running down my cabinets. I guess I learned my lesson to practice what I preach.
FYI, we ended up having cereal for dinner that night, Lucky Charms and Merlot is not a good combo if you're wondering. I wish I would have thought of this advice before my dinner fiasco.
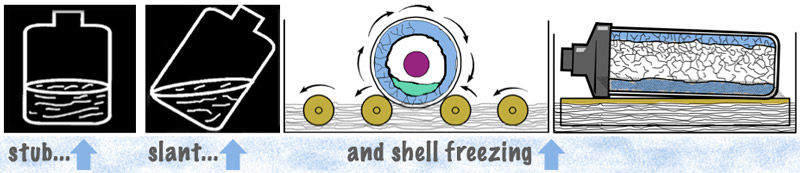
Pre-freezing methods pictured from left to right: Stub, Slanted, Shell (front and side views).

Freeze drying samples using flasks is the most common method to lyophilize. Because of this, flasks specifically manufactured for the freeze dry process are required. These flasks are designed to handle the deep vacuum pressures required for lyophilization, and prevent leaks while under vacuum. Labconco’s Fast Freeze Flasks are made up of two parts: a glass bottom and a rubber top. Either a glass or stainless steel adapter connects the flask to the freeze dry port.
Test tubes and micro centrifuge tubes can be inserted into the flask when freeze drying small samples.
The pre-freezing process is typically where a flask will break, if done incorrectly. Here are four tips that save glass-break heart-ache.
- Never fill a flask to more than 1/3 of the flasks total capacity. For a 600ml flask, this is no more than 200mls of liquid.
- Freezing the samples in a shell freezer or on a slant is highly recommended. As you can guess, a sample expands as it freezes. If the flask is upright, the expansion can cause the flask to break.
- When pre-freezing on a slant, remove the rubber lid because it can also cause breaking during the pre-freeze process. To cover a flask during pre-freezing, use parafilm or aluminum foil. If using shell freezing method, the lid must be used to prevent the sample from spilling.
- If pre-freezing in dry ice or liquid nitrogen, be sure the flask is cold before placing it in the liquid N2 or dry ice. The extreme temperature changes will affect the glassware. And if possible, store the glassware in a standard freezer when not in use.

Flasks can also break during the freeze dry process. Hairline cracks or nicks in the glassware that may not be visible to the eye, can cause cracking under cold temperatures or when put under vacuum.
The broken flasks in the picture at the top of this article were caused by at least two of the four reasons listed above—the flasks were pre-frozen upright and were overfilled causing breaking.
To protect your freeze dry glassware, handle it carefully. Bumping it on countertops or other equipment could cause nicks. Replace glassware if you see any cracks or etches. Don’t freeze dry with compromised glassware, it could cause breaking ruining the sample and possibly causing injury to the user.
Any questions about lyophilization, please contact Labconco at 800-821-5525 or Chat Live on our website.
| chevron_left | How to best protect you and your science: 3 airflow animations | Articles | Is your lab as safe as it should be? | chevron_right |